

Panoshooter in a nutshell
The Panoshooter macro from Dean Zwikel can be used to automate touch inputs on Android phones with the Insta360 app connected to the Insta360 Luna Ultra*. By moving the motorized gimbal, Panoshooter takes 24 photos which can be stitched together in PTGui into a 360° panorama. This increases the maximum panorama resolution from 8K with the Luna Ultra’s built-in method to 28K, making it more future-proof for upcoming headsets. Beyond VR, this also makes the Luna Ultra an interesting lightweight and relatively affordable option for creating high-resolution virtual tours compared with traditional setups using a camera, lens and an automated panorama head.
Luna Ultra + Panoshooter for taking 360° panoramas is suitable for you if…
- you have or are planning to get the Insta360 Luna Ultra camera and are willing to use PTGui or alternative stitching tools
- you want extremely high-quality 360° panoramas for VR, virtual tours or other applications
Luna Ultra + Panoshooter for taking 360° panoramas is less suitable for you if…
- you need to shoot dynamic scenes: as this method captures multiple images sequentially, moving objects might appear misaligned or duplicated
- you need a fast method of just pressing a button and getting your panorama
- you do not want to use a tripod
- you want to capture 360° videos
360° on Insta360 Luna Ultra
The popularity of gimbal cameras is increasing. DJI has been active in that area with its DJI Osmo series. While the Osmo cameras do support capturing a 180° panorama through gimbal movements, the current DJI series lacks the capability of capturing 360° content without physically moving the camera as the allowed gimbal rotations are limited.
Insta360 is known for pioneering various monoscopic and stereoscopic 360° cameras. The most popular ones, e.g. Insta360 X6*, use two approximately 190° fisheye lenses, one on each side. A single shutter press captures images from both sensors at the same time. The two 190° fisheye images are stitched together either in the smartphone app or on a desktop PC in the Insta360 Studio app. This approach is great to easily capture dynamic content. However, it is limited to the two sensors taking the two pictures of the final 360° media. In comparison to that, taking multiple high-res images and stitching them has the advantage of creating a much more detailed panorama. However, this is at the cost of losing support for capturing dynamic scenes as objects move around between different images taken.
Even if the final exported panorama, stitched from multiple high-res images, is later downscaled to 8000 × 4000 pixels as in the case of the built-in Insta360 Luna Ultra pano mode, it shows more clarity and detail than many of the other 360° cameras, despite high-megapixel counts such as 120 megapixels (15520 × 7760). It is often not discussed that output resolution alone does not determine actual image detail. With a conventional Bayer sensor, the full RGB value of each output pixel is reconstructed from neighboring sensor samples through demosaicing. Lens quality, sensor resolution, image processing, sharpening and stitching can therefore have a major impact on the amount of real detail in the final image. By capturing different parts of the scene with multiple high-resolution images and then downsampling the stitched result, the final panorama can retain more fine detail and produce cleaner sampling. Fine detail from the higher-resolution source images contributes to a cleaner and more detailed result after downsampling.
Insta360 Luna Ultra pano mode vs. Panoshooter
The built-in pano mode for 360° photos captures the multiple images quite quickly. It takes about 20 – 25 seconds to capture the full environment. Because the capture is relatively fast, scenes with slow-moving subjects, e.g., a pedestrian walking in the distance, can sometimes work perfectly well without ghosting or duplicated objects. The final image is directly stitched on the camera at 8000 × 4000 pixels as an equirectangular 360° panorama.
As described above, that quality is already very good due to the higher-res input images. However, more is possible and to remain future-proof for current and upcoming higher-resolution VR headsets, it is very reasonable to want the same hardware to be able to capture in even better quality.
This is where the Panoshooter macro comes in!
Panoshooter macro for Android devices
The macro from Dean Zwikel automates precise gimbal positioning and capture steps that would not be practical to perform manually. Using the virtual joystick in the Insta360 smartphone app, it rotates the camera on the gimbal and takes enough photos in all directions so a proper 360° panorama can be created from them. To do this all easily and automatically, the tool MacroDroid is used. It is an app with elevated permissions that can automatically perform touch and drag gestures from macros on Android devices. MacroDroid is free, but after seven days of usage, either watching ads is required to continue using it or a one-time payment of 6.99€ can be made. I highly recommend the latter to save time and nerves, and to support the developer of MacroDroid.
As a next step, the free Panoshooter macro from Dean Zwikel needs to be downloaded. You can get access and support for it in the Panoshooter Google Group.
As there can be small unit-to-unit differences between Luna Ultra cameras, including slight differences in gimbal motor speed, and performance can also differ between Android phones, calibration is required for each setup. Therefore, the first step is to use the calibration scripts from Panoshooter. During calibration, the pixel position of the virtual joystick’s center in the app needs to be set first. You can measure that yourself on a screenshot of the Insta360 app connected to the Luna Ultra. Several popular phones have been tested with it already, so there might already be a value in the public download. After that, you have to run various tests using the Panoshooter scripts and use two printouts to check how many degrees the gimbal moved to fine-tune the calibration.
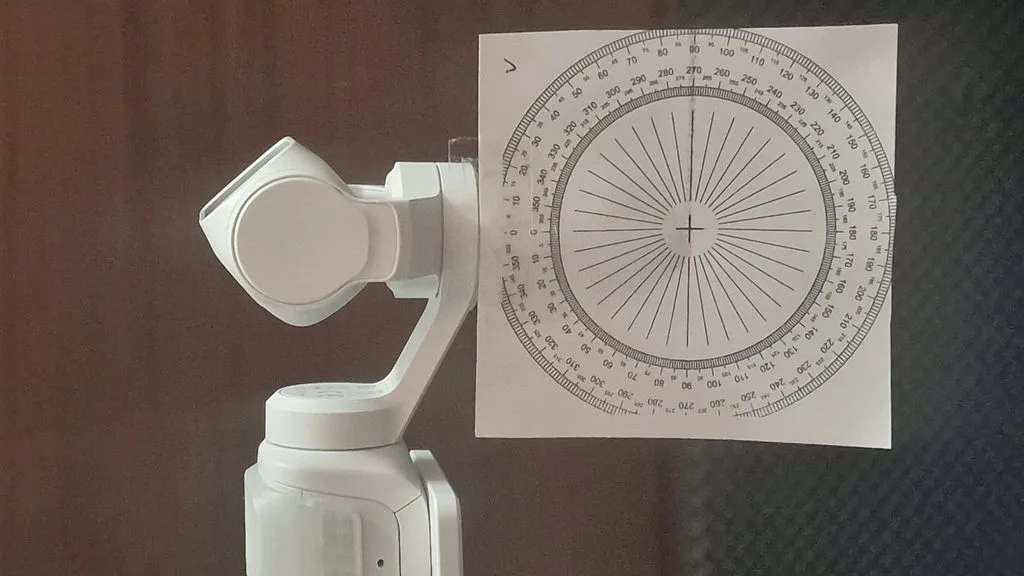
After that is done, you can go out and take your first test shots. I would recommend doing that first for testing and not yet for an important shoot. If you do indoor test shots, it is important to note that white walls and white ceilings can make the final images harder to stitch together. In my case, when I did test shots as a beta tester of Panoshooter, I got better test results from my balcony compared to indoor shots.
When the capture is done, you can copy the images to your PC. You will need to have the panorama tool PTGui installed. There is a free trial version of it. However, for use without watermarks, a paid license is required, e.g. the PTGui 13 standard personal license for currently 175€ + VAT. The Pro version is not required for what we want to do. For PTGui, Panoshooter includes an XML file which helps PTGui align the captured images for better stitching. A preview with labeled image numbers shows the expected equirectangular output. If any areas are marked gray, except the bottom area, then the calibration might not have been ideal and should be revisited.
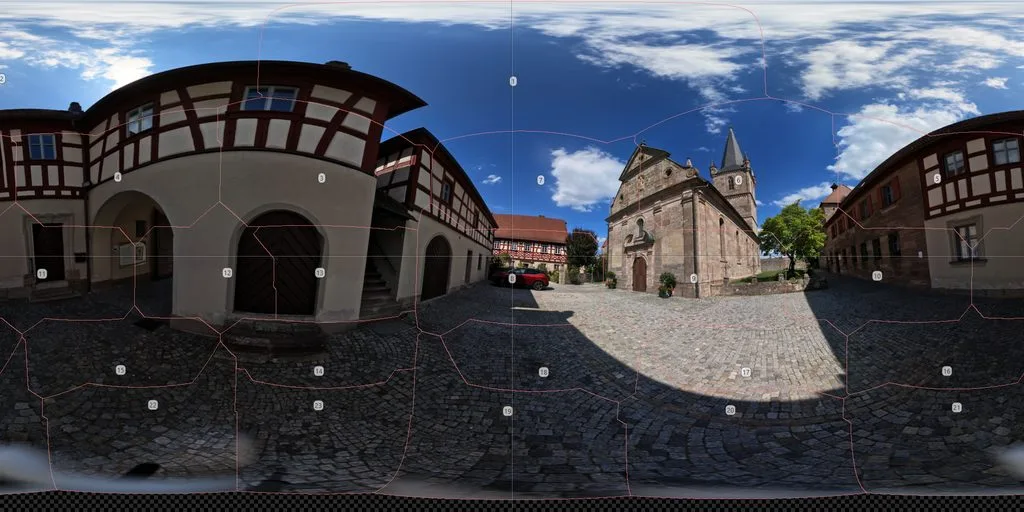
Finally, you can press “Create panorama” in PTGui to export. The maximum resolution is 27654 × 13827 pixels. Lower-res versions can easily be created by changing the 100% value in the tool to e.g. 50% for output with 13826 × 6913 pixels.
Results
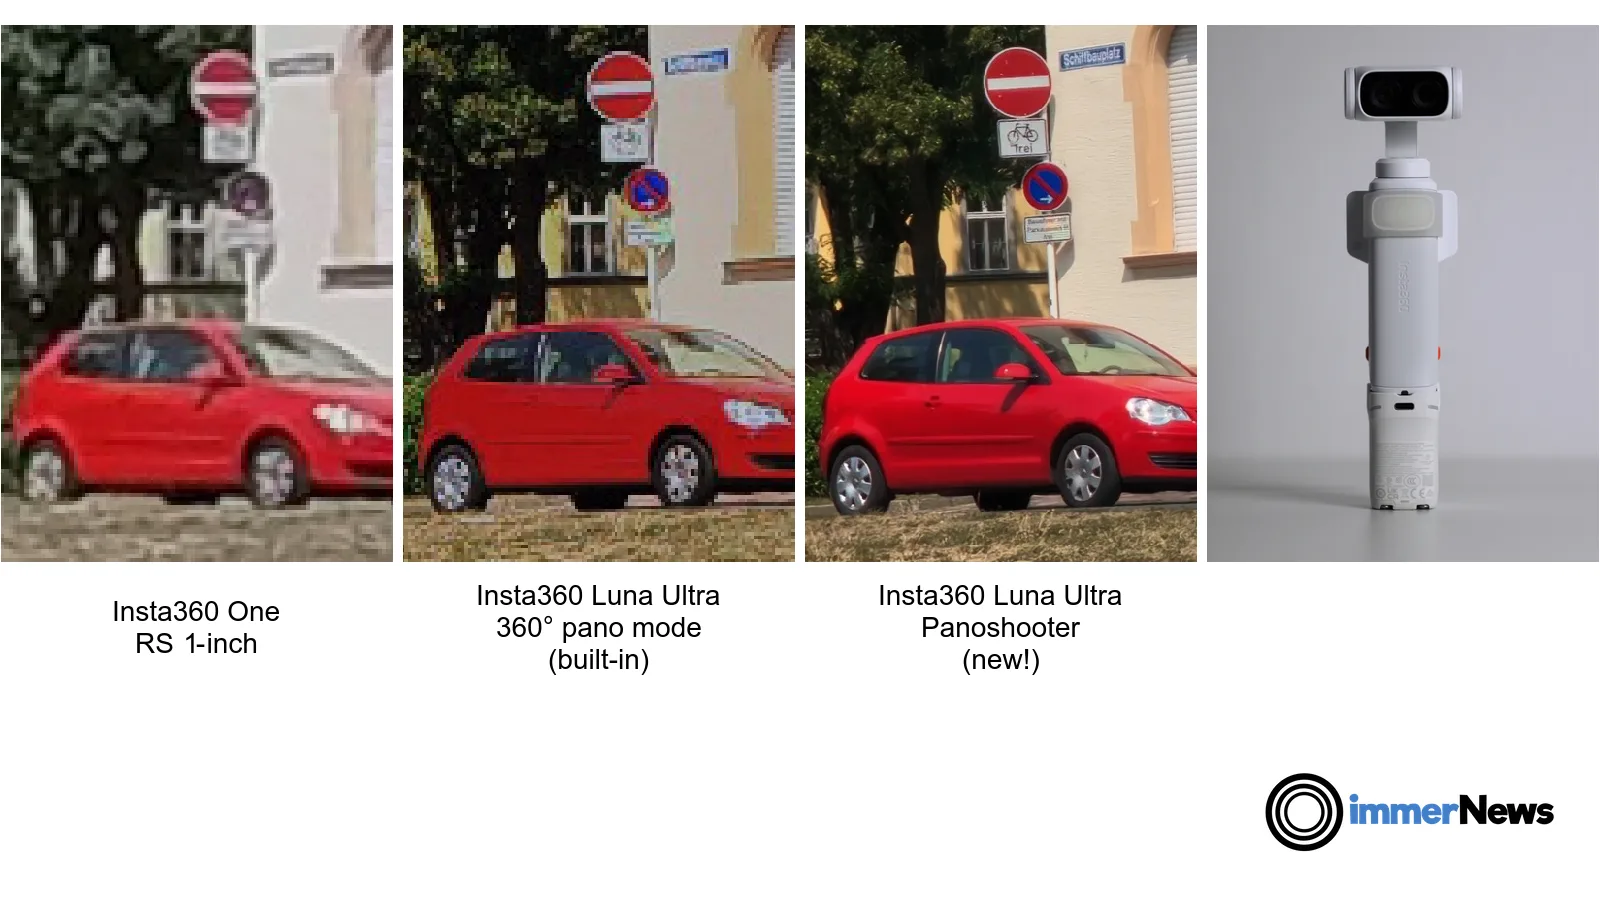
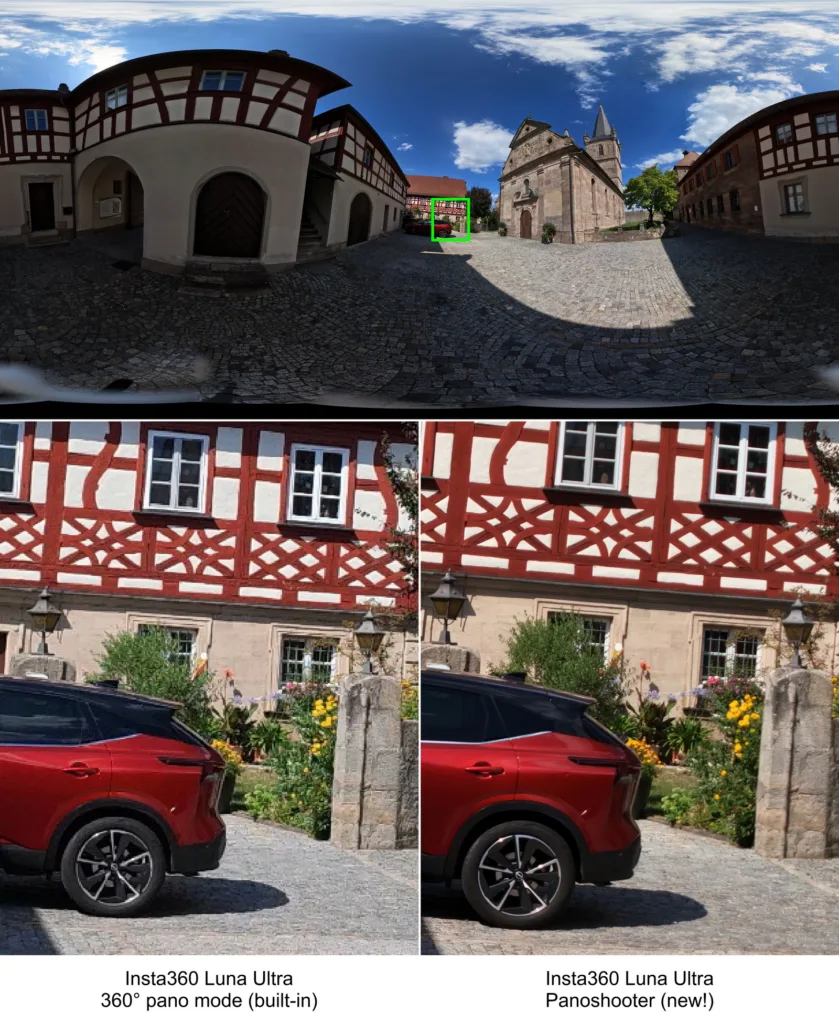
First, we have a look at a crop of an equirectangular panorama shot on the Insta360 ONE RS 1-Inch 360 Edition, which was one of the most highly recommended professional monoscopic 360° cameras in 2022. We compare that to the built-in automatic panorama capture of the Luna Ultra and to the result of using Panoshooter on Luna Ultra. For the Panoshooter comparisons below, we used fixed exposure and ISO, without manual image enhancement or stitching corrections. Panoshooter can also capture RAW (DNG) images, providing considerably more flexibility for post-processing than the built-in Luna Ultra pano mode, which outputs only the final JPG panorama.
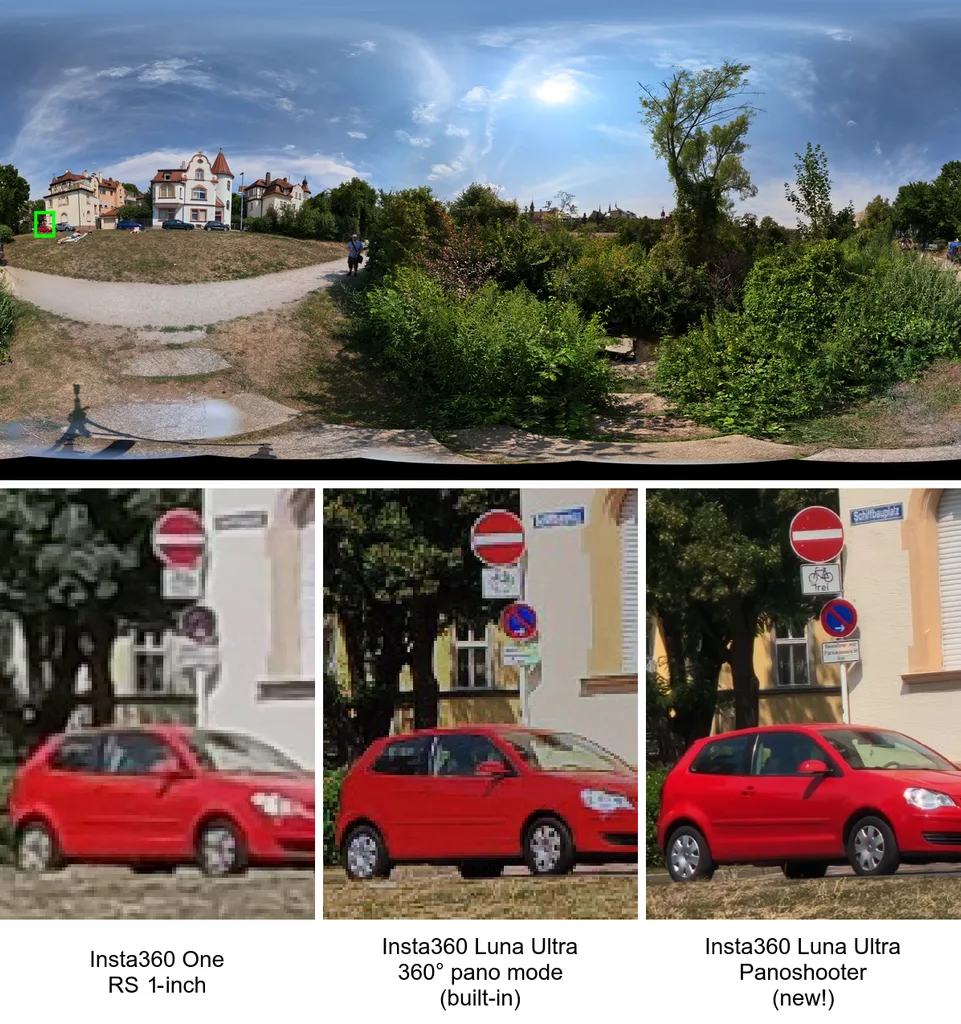
In a second example, we compare the Luna Ultra’s automatic built-in 360° mode with the new Panoshooter macro.
Impact on Virtual Reality and Sample Download
How much of a difference does the increase from the Luna Ultra’s 8K pano mode to 28K with Panoshooter make on current VR headsets?
- On Quest 2 and Quest 3S, the limited display resolution does not make a significant difference
- On Quest 3, a small difference in sharpness and clarity can be observed, with fine patterns such as roof tiles no longer showing visible moiré.
- For the upcoming next Meta headset, codenamed Phoenix, with a rumored resolution of 2560 × 2560 pixels per eye (approximately 44% more pixels compared to Quest 3), the difference should be clearly noticeable
- For higher-res headsets such as Apple Vision Pro, HTC Vive Pro 2, various Varjo headsets and the upcoming PICO Space Pro, the visual difference can be significant
However, it is best to judge for yourself. Therefore, I packed up the comparison shots so you can either compare them on a 2D monitor or in your headset.
You can either manually download our Insta360 Luna Ultra panorama photo comparisons (256 MB) with Panoshooter or, in our VR media player app immerGallery for Quest, PICO and SteamVR, use the short download URL pano under Downloads, Custom URL, then press “Go!”. In immerGallery, you can enable Settings, Advanced, Keep yaw rotation between 360° and Settings, Experimental, Faster fading to switch between the images quickly while keeping your orientation in the panorama.

Practical tips
- At around 33°C ambient temperature, my camera overheated after roughly three full Panoshooter runs. In very warm conditions, consider short cooldown breaks.
- Offsetting the camera on a selfie-stick on the tripod helps reduce how much of the tripod legs appear in the panorama
Conclusion
The Panoshooter macro from Dean Zwikel greatly enhances what the Insta360 Luna Ultra can do and makes it one of the best cameras for high-resolution monoscopic 360° panoramas within its limitations: for a static scene and enough time for shooting (2 minutes 20 seconds vs. 25 seconds for built-in pano), it delivers excellent image quality at high resolution.
For current high-resolution VR headsets and new VR devices coming in the next few years, the increased resolution compared with the Luna Ultra’s built-in 8000 × 4000-pixel 360° panorama should be clearly noticeable. High-resolution virtual tours viewed on 2D displays can also benefit from the additional detail.
We are hoping that Insta360 is listening and impressed as well: it should not be too hard for them to add a mode in a future firmware update in which the individual images taken during the internal 360° pano mode are saved in their full resolution, allowing users to stitch these themselves in PTGui. While the auto pano mode is currently done in the standard, lower-resolution photo mode, it would also be easy to allow this for the higher-resolution UltraPhoto mode, which is also the preferred mode for Panoshooter. As Insta360’s own firmware can directly control the gimbal motors, coordinate their movement and confirm when a shot has been saved, the capture time would still be much faster than what can currently be done through the virtual joystick movements with safety margins to allow the gimbal movement and image capture to complete.
Outlook: In China, the Insta360 Luna Pro has already been released. It looks very similar to the Luna Ultra, except that it uses a single-camera design instead of a dual-camera design. Panoshooter is also likely to work on the Insta360 Luna Pro. If confirmed, we will of course report on it on immerNews.
Let us know what you think about Panoshooter and feel free to share your experience with it in the comments below.
Links
* Affiliate link: If you purchase through this link, we may receive a commission. This does not influence our editorial coverage.
Thank you very much for your thorough test and explanations. My experience has been very similar.
However, I believe Dean’s Panoshooter is particularly well suited to very large, highly detailed interiors, where the additional resolution makes a noticeable difference. In smaller rooms, the improvement over the Luna Ultra’s built-in panorama mode is less significant.
I have also created a comparison between Dean’s 28K panorama and a 50K panorama captured with a 50mm lens. Perhaps this will be of interest as well:
https://www.clever-click.ch/dom-arlesheim-50k-und-28k/
Beautifully detailed panorama. Can it be somehow downloaded to be viewable in VR headset?
I second that. Would be fantastic to view both images directly in VR. From the website, there is much more detail and quality in the 50K pano. In VR, given the display limitations (without zooming) even on Vive Pro 2, it might not make a difference.
Werner, if you would be willing to share these directly with us, I would be happy to host it on my webspace as well. You can reach me over support@immervr.com if you want to share a private link first.
Looks very good! Thanks for sharing!
> At around 33°C ambient temperature, my camera overheated after roughly three full Panoshooter runs.
I never thought that the photo mode can be so thermally demanding for a camera. So far I’ve seen reports about cameras overheating only during video recording.
It is probably a rather stressful scenario at 33°C for that camera where at spring or winter temperatures it would have cooled down by itself. I think it is just important to know that overheating can happen, so a bit more time can be planned in for shooting.
Thank you so much for covering Panoshooter in the launch of immerNews and for participating in the beta test. Panshooter is still very new. I only started working on it about a month ago when I saw the potential to use gimbal cameras like the Luna Ultra to create high resolution 360 spherical panoramas. Insta360 saw the use case for 360 spherical panoramas but limited it to a simple 8K in-camera stitched JPG-only mode. My initial hope was that the camera manufacturers would also see the use case for high resolution 360 spherical panoramas and add the capability to use the camera as an integrated camera/lens/automated panoramic-head that is also more affordable and portable than traditional ones. However, I suspect they probably see using a gimbal camera for high resolution 360 spherical photography as too niche and might risk impacting their 360 camera sales (probably why Luna Ultra is in-camera stitched, JPG-only). So, I decided to develop Panoshooter as proof-of-concept that could be useful to photographers and might help incent the camera manufacturers. It’s been encouraging to see that there are so many people interested in trying it. I’m interested in constructive feedback.
I’m currently working on adding AEB capture capability. The Luna Ultra does not currently have HDR or AEB so it would need to be done by Panoshooter capturing multiple shots at each of the grid positions. It is possible but would obviously increase panorama capture time. However, I think this might still be of value since not every pano needs multiple exposures. I’m currently thinking to add 3- and 5-exposure AEB with a 2 EV separation.
I’m also planning to test Panoshooter with the recently announced Luna Pro. I think it has the potential to work better with Panoshooter since it has a single lens that is positioned directly in front of the gimbal’s vertical axis of rotation. It is also more affordable than the Luna Ultra.
Some people have asked about support for the DJI Pocket 4 and 4 Pro. Unfortunately, this is not currently possible. I tested with the Pocket 4 and found that the pan range was too limited. I contacted DJI about this since I found that the range was more limited than published in their specifications. DJI engineering informed me that the pan range is less when using the joystick (real and virtual). They said this is also true of the 4P. I encouraged them to add this to their published specifications so that potential buyers can consider it when making a purchase decision. Hopefully, DJI will increase the pan range in the future.
Regarding viewing high resolution 360 spherical panoramas in a VR headset. A good approach is to render the full-resolution panoramas into web-based “tiles” using specialized software (such as Pano2VR). The panoramas can then be hosted online or locally, and viewed on the headset using a browser such as the Meta Quest Browser. This technique only streams the specific pixels being viewed when zooming into the panorama, enabling the panorama to be viewed in its full detail. You can see an example of this if you access Werner’s comparison via the headset browser. Here is another example:
https://360gigapanos.s3.dualstack.us-east-2.amazonaws.com/DowntownArlingtonHeights/index.html
Many thanks to you for releasing Panoshooter and making the Luna Ultra so much more capable! Also thanks for sharing what is next. I am looking forward to test the new AEB version to create high-res HDR 360° panoramas.
The other great effect of Panoshooter is now that even if Insta360 or DJI might have concerns at first that integrating such a high-res mode with saving individual images might be a bit of competition to their own products, it can now also be a purchasing decision to go with either of the companies, depending on which one has better 360° support. I was myself initially looking for a gimbal camera for YouTube videos a few months before Luna Ultra became available, but was already rumored to be released. I was divided between getting a DJI gimbal camera or the one from Insta360. The final decision criterium was for me when I learned that the Luna Ultra can do 360°, which I can use for my VR galleries, and the DJI model is limited to 180°x180°.
Hopefully, this growths into a healthy competition around the 360° feature between DJI and Insta360 of which we as customers benefit.
Hi Daniel,
Your Panoshooter macro for the Luna Ultra looks extremely interesting for high-resolution virtual tours.
Have you noticed any parallax or stitching problems caused by the main lens not rotating around its entrance pupil? In particular, have you tested it indoors with objects close to the camera, and could you estimate the minimum distance beyond which the parallax becomes negligible?
Do you think a small mechanical offset or nodal-point adapter could improve the results, or would it interfere with the gimbal’s movements?
Thank you!
Hi Philippe,
High-resolution virtual tours do seem to be the most popular use case for Panoshooter but there are others (construction, facility maintenance, education).
Theoretically, one would expect stitching issues with objects close to the camera due to the lens not rotating around the NPP axis. So far, I have not noticed such issues. I suspect credit for this goes to PTGui. I suspect Panoshooter will be used for larger indoor scenes where the high resolution is required and which often have fewer objects close to camera anyway. But, we’ll see. I think using the Luna Pro should also help.
I don’t see how a mechanical offset or NPP adapter could be attached without disassembling the camera head.
Thank you,
Dean
Dean, not Daniel, sorry. Hello Daniel by the way 🙂